| indoor gardening...  & outdoor gardening...  sushi dates...  & baseball games...  bare legs...
& beach days.  via w/ milk & sugar http://withmilkandsugar.blogspot.com/2013/05/kristin-lately.html | |||
| | |||
| | |||
|

Friday, May 31, 2013
Kristin Lately...

Chicken Enchilada Puffs
 I have made these delicious little puffs twice this month already. And the first time I made them my sister came over for a visit. She loved them so much that she made me make some more to take home to her hubby. When you pay a visit to The Recipe Critic you never leave hungry or empty handed. :) I loved how easy these are to make. I was even able to show my sister who isn't very confident at cooking step by step how to make them. You can have them in the oven by the time that the oven is preheated. These puffs are packed with amazing flavor and the cream cheese inside is awesome! This is one of those recipes that is especially great when you want to have a great meal that doesn't require a lot of effort!  Rating: 5 stars Difficulty of Recipe: 2 stars Chicken Enchilada Puffs
1. Preheat oven to 375 and line a cookie sheet with foil and spray with non stick cooking spray. 2. Soften cream cheese in the microwave for about 20 seconds. Stir in chicken, seasoning mix, enchilada sauce, 1/2 cup and Mexican shredded cheese until combined. 3. Unroll crescent rolls on pan. Place a heaping tablespoon of chicken in the center of the two short ends of the crescent. 4. Pull outer corners of the crescent roll over the chicken mixture, and then pull the long end over completely enclosing the filling. 5. Sprinkle the tops of the puffs with the Mexican shredded cheese. 6. Bake for 15 minutes or until golden brown. Recipe Adapted from Tidy Mom via The Recipe Critic http://www.therecipecritic.com/2013/05/chicken-enchilada-puffs.html | |||
| | |||
| | |||
|
[Book Review] Black & Grey Tattoo – Photorealism: Volume Three
 Author: Marisa Kakoulas and Edgar Hoill Publisher: Edition Reuss Date Published: September 2010 Movie icons such as Marilyn Monroe and Bruce Lee, horror movie characters, and animal/pet portraits dominate the pages of Volume Three. The wrinkles on the faces, the flowing hair and the twinkle in the eyes brings these tattoos to life. It takes only an instant to recognise the famous face; the resemblance is uncanny. To be able to recreate a photo onto skin in such a way that it too looks just like a photograph is the talent of a true artist. The work of Bob Tyrrell graces over 20 pages of Black & Grey Tattoo – Photorealism: Volume Three. He's a world renowned artist who refuses to book clients months or years in advance, choosing to take the clients as they come, whether that be at his shop or at the many tattoo expos he attends. Tyrrell is a humble and down to earth guy who prefers black and grey work, only occasionally doing a colour piece because he feels "that someone else can do it better than me." He knows his strength and has worked tirelessly to perfect his craft. Andy Engel was a guy who left the world of rock 'n roll to become a tattoo artist. Engel specialises in realism and works from his studio in a small German town where people trek every year to be tattooed by him. Tattoos are something which bring joy to our lives, but for some it has brought back a sense of normalcy to theirs. Engel, in the past, has joined forces with a local hospital, working with breast cancer survivors to perform nipple reconstructions. He tattoos realistic nipples and aureoles onto their reconstructed breast tissue to make it look just like their other non cancer affected breast. It really is quite moving how a tattoo can make these women look and feel as though their bodies had never changed. For many years the tattoos we knew were taken from flash sheets hung on the walls of tattoo parlours. As tattooing grew to being considered an art form tattoo artists have been pushing the boundaries, focusing on bringing a clients vision to life. "The most exciting portfolios of realistic work are not just those of long-time veterans but of "tattoo prodigies." These young artists, with just a few years of experience, have approached the style with vigour and curiosity in experimenting with different techniques. The result has been hyper-realistic work that looks just as good over time as it does freshly tattooed." All three volumes in this series are such an honest and heart-warming celebration of tattoos, art, skin and ink. I'm so excited to see how much the tattoo process and tattoo styles will change over the course of my life. The book is translated in to English, German and Spanish. Where to purchase: Book Depository - Cheapest by far and free shipping worldwide. via Stacie Michelle http://stacie-michelle.blogspot.com/2013/05/black-grey-tattoo-photorealism-volume.html | |||
| | |||
| | |||
|
Unbaked Chocolate Oatmeal Cookies Recipe
| Ingredients 1/2 cup butter Directions Cook butter or margarine, milk and sugar in kettle and boil for 1 and 1/2 minutes. Add peanut butter, oatmeal, cocoa powder and any one of the optional ingredients. Drop on waxed paper and allow to cool before serving. via Tasty Chocolate Recipes http://tastychocolaterecipes.com/unbaked-chocolate-oatmeal-cookies-recipe.html | |||
| | |||
| | |||
|
Baker's Dozen: A Batch of Sweet Links!
|
Swirlz Cupcakes = super tasty! Try them in Chicago (pictured above). Best breakfast baked goods in New Hampshire? Thank god! Now, your sugar can be caffeinated, too. The state of the retail baking industry? So-so, says this article. Six new dessert trends, in Columbus. Pineapple muffins? Sounds yum to me. A regional specialty in Oklahoma: Aunt Bill's Brown Candy! Twinkies return to production..what does it mean for a small town? Warm and gooey deep dish chocolate chip cookies. No part of that is wrong. Need a graduation cake idea? Dessert trends on the rise: dacquoise and fig cookies. Huh! Selfies with pop-tarts. My new favorite thing. Don't forget to enter this totally sweet contest: share the secret life of YOUR favorite baked good! via CakeSpy http://www.cakespy.com/blog/2013/5/31/bakers-dozen-a-batch-of-sweet-links.html | |||
| | |||
| | |||
|

Thursday, May 30, 2013
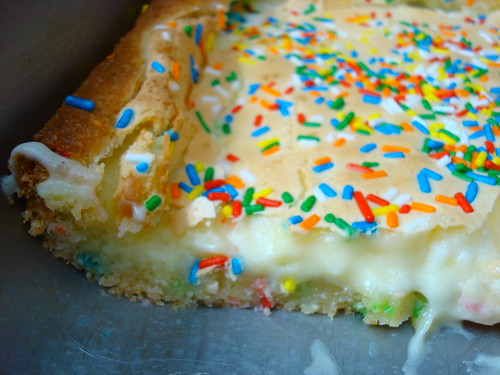
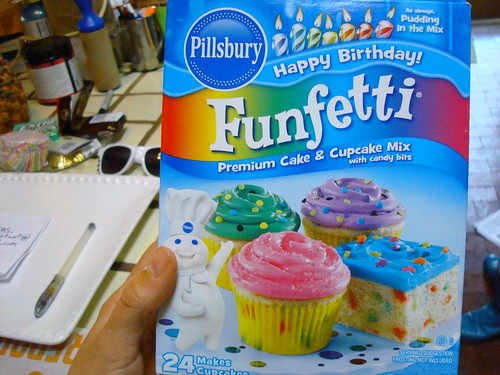
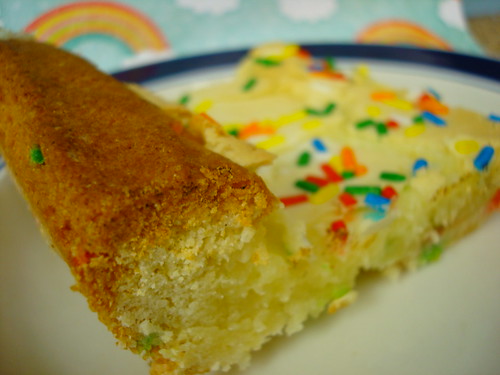
Funfetti Gooey Butter Cake Recipe
|
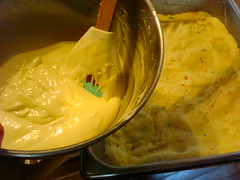
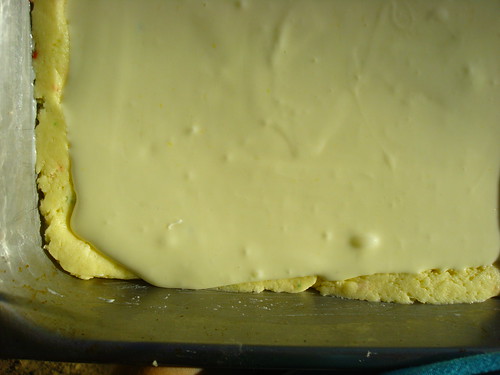
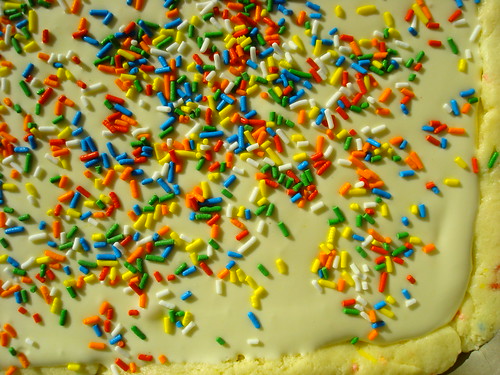
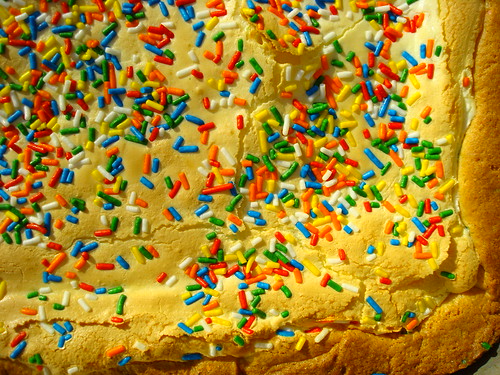
Gooey Butter Cake is one of those inherently perfect foods. I mean, just consider the name. Gooey Butter Cake. No part of that is wrong. But how to make it even more right? Since many St. Louis-style Gooey Butter Cake (if you want more about the history of the cake, btw, click here) recipes call for cake mix anyway, I figured, why not add an ingredient that has "fun" in the mix: Funfetti Cake Mix! Everyone knows that Funfetti is more fun than regular old yellow cake mix. Why? Well, last time I checked, yellow cake mix didn't have rainbows hidden inside. You simply can't argue that logic.
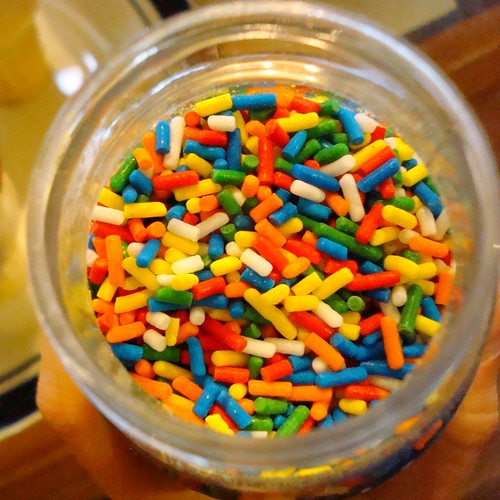
So, I broke out the Funfetti and got to work, simply swapping it out for the called-for yellow cake mix in the recipe. I also garnished it with rainbow sprinkles, you know, for additional magic.
Gooey Butter Cake is already sort of an indulgent, guilty-pleasure food, and the Funfetti made it even more so. The little pockets of sugary rainbow bits in the cake don't take away any of the pleasure of this cake, and the sprinkles on top made it festive. While it wasn't a huge change from the original recipe, I truly believe it was a small swap that made it magical!
Here's the recipe; enjoy! Funfetti Gooey Butter Cake Recipe (printable version here) Ingredients:
      via CakeSpy http://www.cakespy.com/blog/2013/5/30/funfetti-gooey-butter-cake-recipe.html | |||
| | |||
| | |||
|
Homemade Strawberry Lemonade
 I don't know what it is about me and strawberries, but I am obsessed! I made a special trip to Costco just to get their amazing strawberries. I love buying strawberries when they are in season and perfectly ripe and juicy. I love using them in recipes, especially homemade jam. That is if they make it to the recipe! I ate one pound all by myself yesterday! They were just so good I kept eating them one by one. Needless to say I had to make another trip to get some more strawberries because we ended up making 3 batches of this amazing strawberry lemonade. I have always loved strawberry lemonade and I order it wherever we go. Since I didn't grow up on soda I have always preferred strawberry lemonade and it quenches your thirst so well especially on a hot summer day!   Homemade Strawberry Lemonade
1. In a blender, combine 1 1/2 cup strawberries, juice of 2 lemons, and agave nectar. Blend on high until smooth about 2 minutes. 2. Pour into a pitcher and whisk together with the cold water. Refrigerate until chilled about an hour. 3. Serve with ice and garnish with strawberry. Enjoy! Recipe Adapted From Cooking with my kid via The Recipe Critic http://www.therecipecritic.com/2013/05/homemade-strawberry-lemonade.html | |||
| | |||
| | |||
|
Ham and Cheese Calzoncini
| Of course when I saw these mini calzones I knew I'd be making them for the husband. He's such a fan of my ham and cheese roll ups that I knew these would be an instant hit. You could fill the calzoncini with virtually anything, pizza ingredients, sloppy joe meat, leftover roast or chicken with onions and green peppers, lots of possibilities. I saw the idea over at Pretty Elements, enjoy! This recipe made 10 calzoncini. Ingredients: 1 ball pizza dough (I cheated and used Pillsbury instead of homemade) ham shredded cheddar jack cheese pepper (we love Lawry's seasoned pepper) 1 egg Preparation: On a prepared surface, roll out the dough to an even 1/4" thickness. Use a glass or circle cookie cutter to cut out circles. I got 20 circles out of my dough which makes 10 calzoncini. Sprinkle some pepper ove r all the circles. Place some ham and cheese in the center of half the circles. Take a plain dough circle and top a filled circle. Carefully pinch the edges together so none of the filling bubbles out during baking. Repeat with remaining calzoncini. Place the prepared calzoncini on a prepared baking sheet. Whisk egg in a small bowl. Brush a small amount of the egg wash over the top of the calzoncini. Bake at 350 degrees F for 16-18 minutes or until golden brown. Serve hot and enjoy. 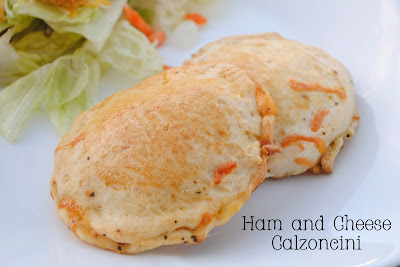 via Durfee Family Recipes http://durfeefamilyrecipes.blogspot.com/2013/05/ham-and-cheese-calzoncini.html | |||
| | |||
| | |||
|
coke chocolate cake
Coke? you ask, in... in a cake??! But how can this be? Yes.  Coke. Coke in a cake, Coke on a cake.  It's an unlikely combination, coke and chocolate. This cake has got the taste of a plain chocolate cake but has a distinctive 'nutty' bite to it from the Coke. The Coke taste isn't overpowering as I originally thought, but you can definitely taste it throughout the cake. And the glaze? It's icing on the cake, if ya ask me. Nutty, yummy, and sweet.  The cake is incredibly light and airy from the Coke. Even when it is a few days old (if it lasts that long, that is), the cake retains its airiness and fluffiness. Originally from this website, here's my take on this delicious cake. Coke Chocolate Cake 2 cups plain flour 2 cups sugar 1tsp baking soda ½ tsp cinnamon 1 cup butter 1/4 cup cocoa powder 1 cup Coke 1/2 cup buttermilk 2 eggs 1tsp vanilla extrac Glaze ½ cup butter ¼ cup unsweetened cocoa powder ½ cup Coke 4 cups icing sugar Preheat the oven to 180C. Mix the flour, sugar, baking soda, and cinnamon until combined. Set aside and over medium-high heat, boil the butter, cocoa powder, Coke, and buttermilk for 1 minute. Take off the heat and add the liquid to the dry mixture. Mix well, then add the eggs and vanilla. Stir until well combined, then pour into a greased 9x13" pan. Bake for about 30 minutes or until a skewer inserted comes out clean. Make glaze. To make glaze: combine all ingredients in a saucepan and boil. Remove from heat, then slowly stir in the icing sugar until it is smooth. Pour the glaze over the hot cake and poke holes into the cake so the glaze is absorbed into the cake.  via butter & jam http://butterandjamblog.blogspot.com/2013/05/coke-chocolate-cake.html | |||
| | |||
| | |||
|
Chocolate-Filled Crinkles Recipe
| Ingredients 1/2 cup butter (no substitutes), softened Directions In a mixing bowl, cream butter and sugar. Beat in egg and vanilla. Combine flour, cocoa, salt, baking powder and baking soda; gradually add to the creamed mixture. Roll into 1-in. balls. Place 2 in. apart on ungreased baking sheets. Using the end of a wooden spoon handle, make an indentation in the center of each. For filling, melt chocolate chips and condensed milk in a heavy saucepan over medium heat; stir until smooth. Stir in pecans, coconut and enough milk to achieve desired consistency. Spoon 1 teaspoon into each cookie. Bake at 350 degrees F for 8-10 minutes or until firm. Remove to wire racks to cool. via Tasty Chocolate Recipes http://tastychocolaterecipes.com/chocolate-filled-crinkles-recipe.html | |||
| | |||
| | |||
|
Subscribe to:
Posts (Atom)